Okay, so let’s begin. I backed it into the driveway, leveled it and put the jacks down to keep everything stable while I work. I pulled out the dinette cushions and the rear gaucho cushion to make room for tools and supplies. I also ran power and brought in a fan, because this is Oklahoma, folks. It’s 100 degrees and humid. First things first, I tackled the water damage. I removed the cabinet which was mostly screwed in, but also had some sneaky nails from the top side of the frame that ran along the front edge; these had to be cut.
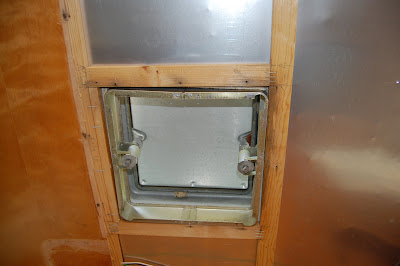
Once the cabinet was out of the way, I could remove the ceiling panel. I pulled the 1” strips and all the nails in the full ceiling panel around the vent. The damage wasn’t very extensive, but I wanted to reinforce the weak/sagging ceiling “beams” while I was at it. I put beams in quotes because they used 1”x2” pine for the supports and after 50 years they have started to bow. I am not removing the walls so I just scored and cut the panel flush with the walls and yanked it out.
 I was surprised that there was very little sign of water damage other than the veneer; the frame around the vent was still intact. I picked up some ¾” square tubing at the Railroad Yard, our local steel yard, for about $10 to reinforce the ceiling. I just predrilled holes for screws and wiring and used 1 ¼” screws to fasten three pieces of steel to the existing wood. I am willing to sacrifice a little increase in weight for the additional 2” of head room and lack of water pooling overhead along a roof seam and vent.

I then installed the Fan-Tastic fan and routed the wiring to be connected later. The fan was a great fit, and easy to do following their step-by-step instructions. I got it from Vintage Trailer Supply for about $140. It has a three-speed fan and is gray in color with a flat, not domed, lid that makes it look similar to the original Hehr roof vent, which now resides in my spare parts pile. While I was sealing up the new vent, I took the time to scrape off old roof cement around the seams to reseal them, as well as a small pin hole near the vent. I used Dicor self leveling seam sealant I picked up from our local RV dealer, Mason’s RV for about $10.
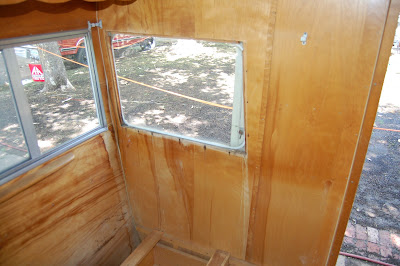
Now that the roof wouldn’t leak, I moved back inside. I removed two pieces of birch from under both windows. Here, there was some water damage to the framing so I removed the ~3,000 50-year-old rusted screws from the bottom of each window, and the glass which was held in with approximately 30 pounds of caulking. I managed to get most of the screws carefully with my cordless driver. Others had to be coaxed with a small set of vice grips. The last couple had to have slots installed with my grinder and were removed with a large screwdriver.


 Once the glass was out of the way and the screws had been removed, I could pull the old frame and install new wood. Luckily, months earlier, being the pack rat that I am, I had picked up about 50 linear feet of oak flooring for free on Freecycle. I used this as my new framing, which substantially improved the rigidness of the front end.
 I then cut new birch panels that I picked up for $17 each at Stillwater's Douglas Building Supply to fit in the ceiling and sides, to be trimmed out later. It took a couple weeks to get the 4x8 sheets but the price was right, and I was still working on the tear out anyway.


 I then reinstalled the glass to keep the weather out until I paint. I want to replace two small areas on either side of the front window, but these will have to wait until I remove the frame for painting. I used more oak to beef up both sides of the dinette and the rear gaucho since all creaked a bit when I settled my delicate frame upon them (HA HA).
After this I will move outside for a while to work on a few exterior projects. So, if you are following along, so far we have:
Trailer $900
Bearing Repack $100
Steel $10
Sealant $10
Fan-Tastic Fan $140
Three Sheets 1/8 Birch $50
Bringing our tally to: $1,210.
Until next time dear readers, shasta la vista...


Excellent read. I like your style...have a good one!/Nice blog! Keep it up!
ReplyDeleteTrailers Parts
Thanks for the nice comments.
ReplyDeletethanks
ReplyDeleteThe better way to fix the leak is use of sealant and having good repute EPDM Roofing is doing well in industry .You can trust and try. I hope you will like it.
ReplyDeleteThat is awesome you managed to fix the water damage in that RV. My home has some water damage and I am trying to restore it right. As you know, it is a lot of work! I am thinking about hiring a professional water damage restoration company to take over for me.
ReplyDeletehttp://teampulido.com/services/temecula-plumbing-damage/
This comment has been removed by the author.
ReplyDeleteHi, nice work. We'd like to reinforce a couple roof beams in our '59 Shasta Airflyte for a 90 lb. roof AC unit (wish they made smaller roof units!). It's been on for 2 years but we are getting quite worried if one day the weight of the unit will damage the ceiling. We want to do this strictly from the inside and not disturb the roof skin. Like yours, the front corners of the cabinet must be secured with screws or ? from the top down. How did you cut the screws? And how/did you reinforce the cabinet when replacing it? We do not want to damage any of the wood work and plan on putting it right back in place once the new support beams are in place. Any advice you have to offer is greatly appreciated!
ReplyDeleteThank you for documenting all of this so well! We have a '63 Shasta Airflyte and were just gathering info on how to do our repairs when we came across your blog! The needed repairs mirror yours almost exactly...SO HELPFUL! Thank you, thank you!
ReplyDeleteAre you looking for the best water damage restoration los angeles ca? We provide Los Angeles water damage restoration services at affordable prices. Call us today.
ReplyDeleteTo avoid all type of problems related with weather there must be some protective shield like RV Roof Coatings to face without harming inside and outside the roof.
ReplyDeleteWow! Thats a lot of mold for that little camper. Im sure that little thing will get beautiful in the end! <3
ReplyDeleteMold pollution is a key element of indoor air pollution that few people understand. Mold has been making the headlines more frequently over the last several years, largely as a result of Hurricane Katrina.
ReplyDeleteThere are more option available at Water Damage Mansfield OH
ReplyDeleteThis is really a nice post.At Swift Restoration we often see first-hand how devastating water damage can be. Swift technicians are available 24*7. If you need a Swift response for water damage repair in Layton then you can count on us!
ReplyDeleteWhen you first begin your search for a good roofing and siding contractor, the most important thing you can do is research. It isn't enough to have a list of potential roofing and siding winnepeg or siding contractors whom you think may be able to perform the work within your budget.
ReplyDelete
ReplyDeleteInformative and interesting Blog! Beautifully written, as usual, I like the post. Thank you so much for nice sharing with us. Keep posting! Water Damage Repair West Palm Beach
Thanks for the post, great tips and information which is useful for all. If you are dealing with any kind of water damage, then don’t wait to call All Brite Cleaning & Restoration. Water Damage Repair Laconia
ReplyDeleteInformative and interesting Blog! Beautifully written, as usual, I like the post. Thank you so much for nice sharing with us. Keep posting! we provide a full range of the services for water damage repair in West Palm Beach to prevent and repair damage to your home or business.Visit on our website Water Damage Repair West Palm Beach
ReplyDeleteI Have Read Your Post This is very nice and informative blog . Thank you for sharing such like of information.
ReplyDeleteWater Damage Repair Holdrege
ReplyDeleteYour blog has always been a good source for me to get quality tips on blogging. Thanks once again. Enjoy our services of water damage restoration in Mission Viejo! At Flood Pro, we have been work for decades and know how to restoration is essential for a property.
I appreciate the detailed account of your process, from removing the cabinet and ceiling panel to addressing the sagging beams. Metro Water Damage Restoration Rochester
ReplyDeleteAddressing water damage, installing a roof vent, reinforcing the ceiling, and sealing exterior seams showcase proactive efforts, ensuring a resilient and well-maintained home. Impressive commitment to home care! Metro Water Damage Restoration Rochester
ReplyDeleteRepairing water damage promptly, installing roof vents for better ventilation, adding ceiling support, and sealing exterior seams ensure a safer, more durable home. Great choices for maintenance! Metro Water Damage Restoration Rochester
ReplyDeleteWow, this blog post offers invaluable tips for tackling water damage head-on! From installing roof vents to sealing exterior seams, it's a comprehensive guide to home repair. Thank you! Metro Water Damage Restoration Rochester
ReplyDeleteGreat job on addressing multiple repairs! It’s impressive to see such thorough attention to detail in fixing water damage and improving overall structural integrity. Keep it up! Metro Water Damage Restoration Rochester
ReplyDelete