Thursday, October 7, 2010

Building a Table and Replacing the Jack

Well, finally I got some work done on the Shasta. I got ready to work on the old girl last spring, but agian I was sidetracked by my kids, other projects, a garden that became a feeding ground for birds and squirrels over the summer, a $500 Mercedes;you know, the usual stuff.

Anyway, after a weekend of labor and a handful of parts, the Mercedes was deemed roadworthy and Cheryl began driving it. Now, as the weather began to break and we could smell fall around the corner, I decided that I needed to get off my keister and get cracking on the Shasta.


I had a few projects on the list that were a priority. The first was replacing the original jack.


I had degreased it, oiled it, kicked it and cursed it. I think there was a mild bend in the tube. I could turn the handle for a while but the higher I needed the trailer tongue, the more Herculean force was needed to turn it. I was afraid that it wouldn’t go back down one of these days and I would have to resort to chopping it off, just to get out of the campground. So, I took a trip to my local farm and ranch store, Atwood’s, and picked up a 5,000 pound jack made by Bulldog for $30.


I had to enlarge the hole just a smidge with a hole saw, but then it went right into place. I also had to drill two new bolt holes, but once painted it will look pretty much stock. For now, I will stick with the gray paint. It jacks the camper up and down like butter, way easier than the old jack. Now I was in the mood for construction. I had forgotten how much fun it was to work on the old Shasta.


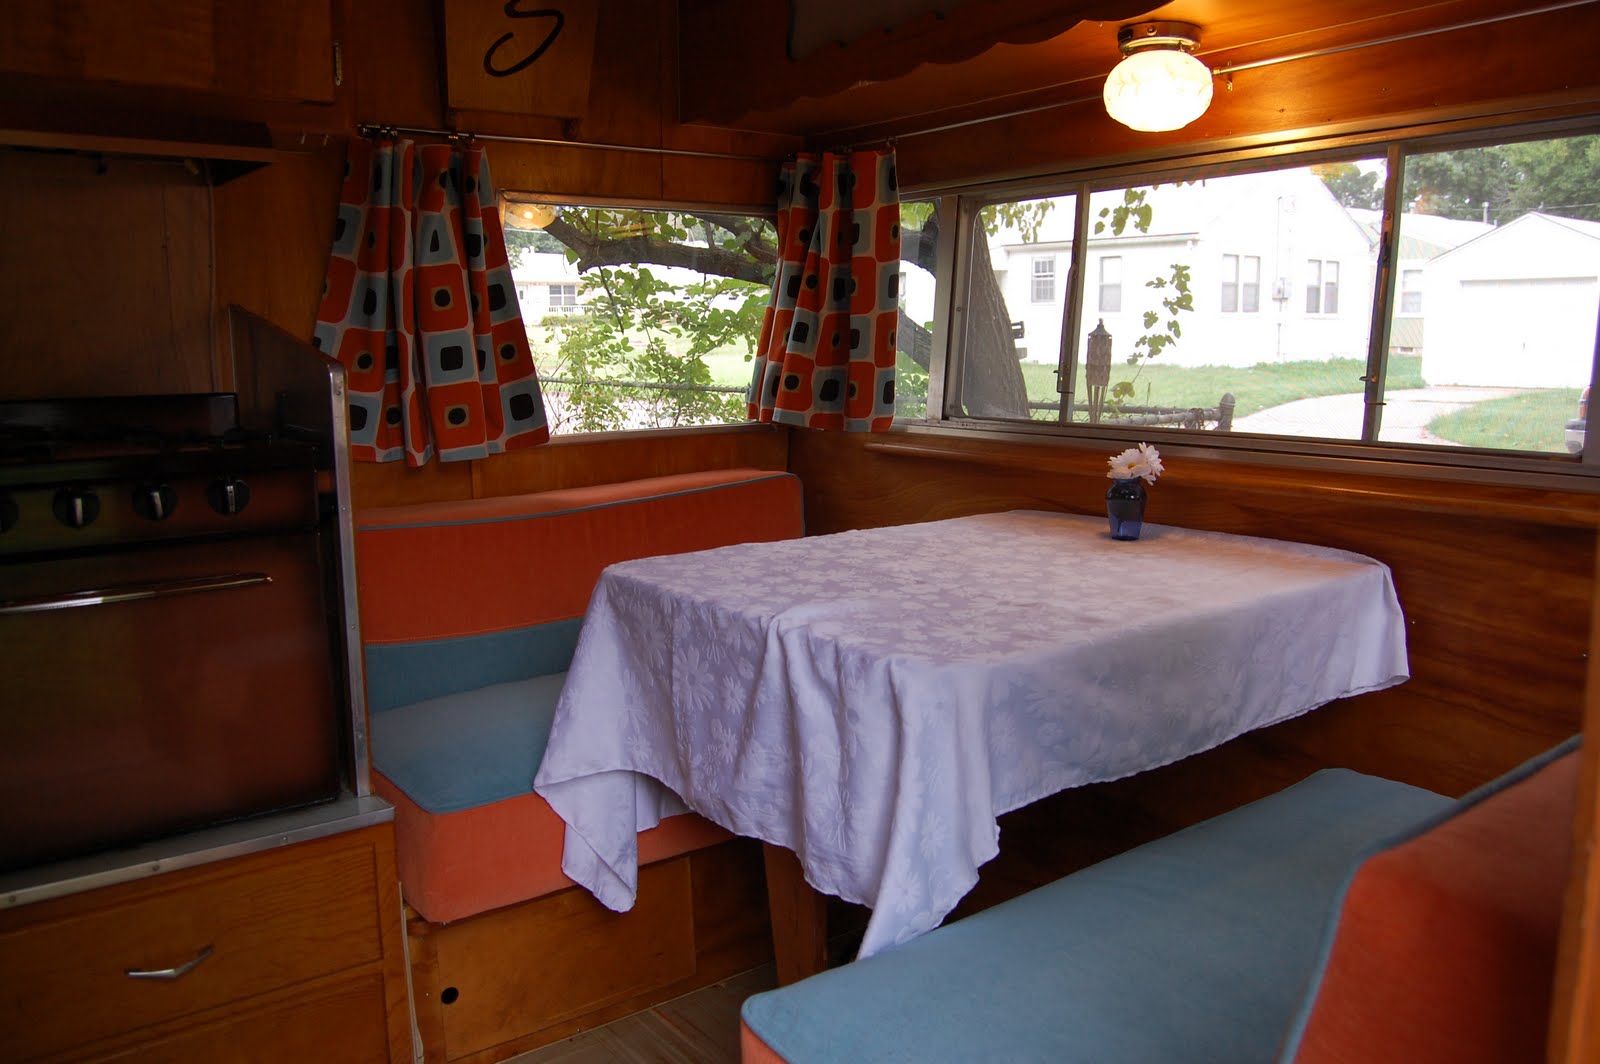
I started on the table. Here is what the existing table looked like.


It had identical rounded corners, cracked 80's formica, and was smaller than the original table by 3" in both directions.


For the last year, we have been hiding the table under this table cloth. It worked, but did not do our new upholstery any justice.


I had plans bookmarked from the Good Stuff site. They have some great resources for wings and tables for Compacts and Airflytes. I had ordered new aluminum trim from my favorite camper store, Vintage Trailer Supply, for $18. I also had to pay for a shipping tube as well, so by the time it shipped to my door it cost me $33. I ordered this months ago with a bunch of other odds and ends and it has been sitting in the tube ever since. I was nervous about 96 inches being long enough, so I went against my usual measure once, order twice, pay twice, cut twice procedure and measured the table plans. It came out to about 96.5 inches so I shaved off an inch from the table length to insure that my molding fit. In hindsight, I could have trimmed 1/2", but it would be very close. For the Formica, I used the 50’s Boomerang pattern in Skylark.


I special ordered an 8’ piece 30” wide from Lowe’s for $40.


I saved the leg and duplicated the ledge at the back that hooks into the wall. For the main table I used ¾ BC plywood. A 4x8 sheet was $30 at Lowe’s. It is exterior grade, but has smooth surfaces and is 5 ply. I cut it down-to-size and finished the corners with a jigsaw.


I cut the Formica down-to-size with a straight edge and a box knife. I cut it oversized about an inch in all directions. I wiped down both the plywood and the Formica backing with a damp cloth and applied contact adhesive to both surfaces with a wooden paint paddle.


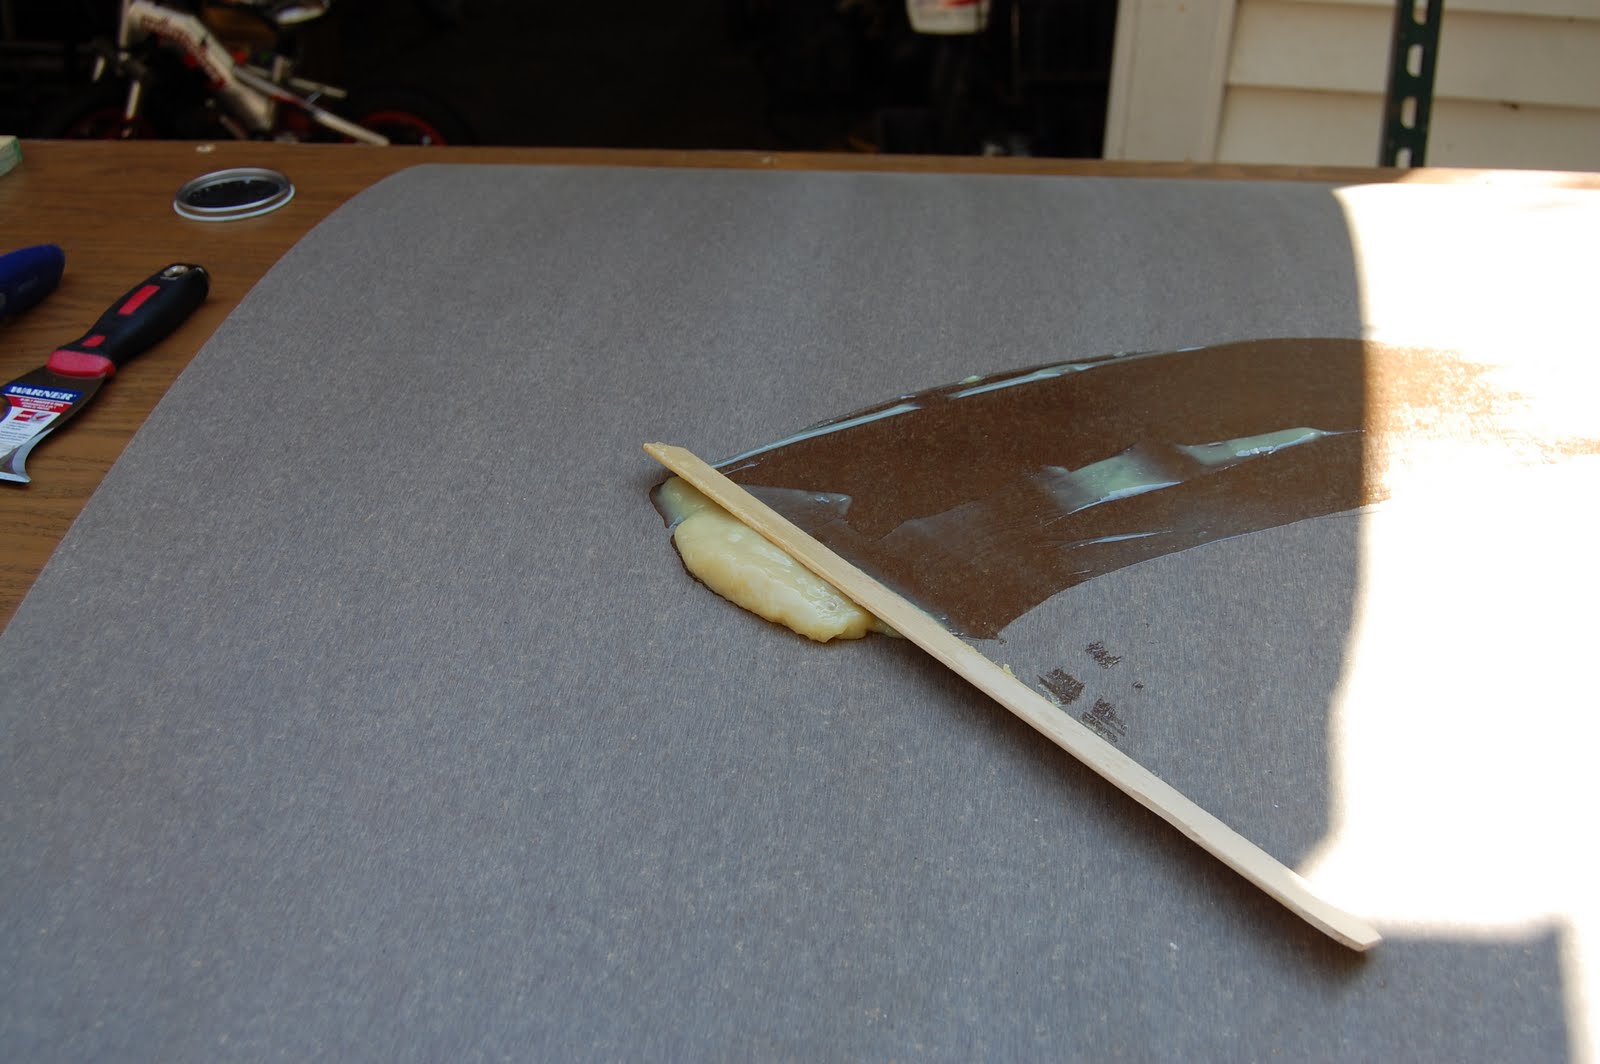
I let both surfaces set up until tacky. I then, starting on one edge, laid the Formica down and rolled it flat with a J-Roller.


I clamped the edges with spring clamps for about 30 minutes.


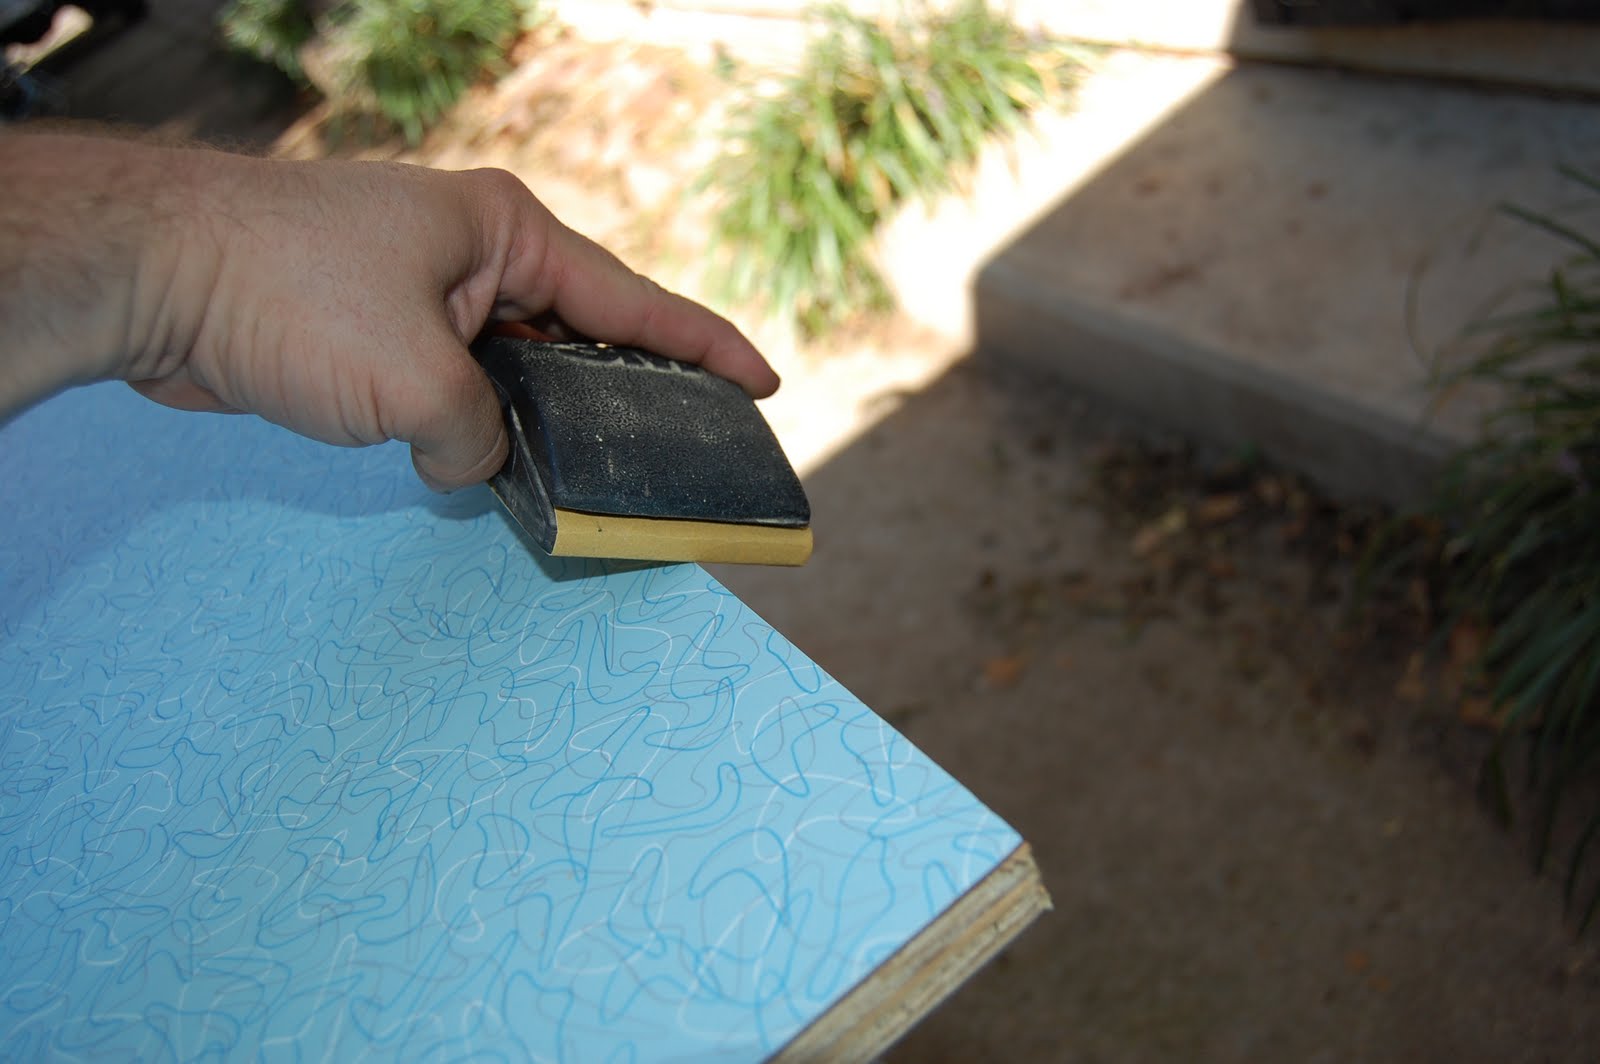
I used a router and a flush bit to trim the Formica down-to-size.


I deburred the edges by lightly sanding the edges with 220 grit sand paper.


I attached the aluminum trim using the screws provided, #4 x ¾”.


I drilled a pilot hole for each screw to insure that I didn’t force the screws between layers in the plywood.


I thought I would have to anneal the aluminum, but it is pretty soft and I just curved it around the corners by hand.


There was a very mild 1/32” bulge at the corners, but I tapped it down gently with a hammer. I count myself lucky that the screw holes did not interfere with the corners.


I had a little trim that overhung the end, which I trimmed off with a cutoff wheel on a Dremel tool.


I saved the leg and hinge off the existing table which I think are from the original table.


Since the original had been glued to the old table, and took some of the plywood with it during removal, I duplicated the back ledge with a new piece of fir.


I then attached the leg and the new back ledge. I glued, clamped and screwed the back ledge to insure that the table stays secure even if the kiddos climb on it. (My suspicions have been confirmed, and it held them.) I used gorilla glue.


Clamped it with a quick grip.


And then screwed it in place.


The leg is a little beat up, but I like to reuse what I can.


I cleaned it up and hit it with a little Howard Wax. All in all, I am very happy with the finished product.


I apologize again, dear reader, for taking so long to give you an update. I hope you still enjoy my progress and keep checking back for more as I work on the wings, the door and put some finishing touches on the Shasta.


So, if you are following along, so far we have:


Trailer $900

Bearing Repack $100

Steel $10

Sealant $10

Fan-Tastic Fan $140

Three Sheets 1/8 Birch $50

3M Polish $18

Buffer Pad $12

Mothers Aluminum Polish$8

TSP Cleaner/Paint Prep $8

Rollers, brushes and trays $30

Frog Tape $10

Etching Primer $5

Goo Gone $3

Paint, 3 Gallons $98

Foam $250

Upholstery Fabric $510

Curtain & Pillow Fabric $80

Glass $50

Glass Seal $72

Backframe Gasket $80

Pile Weatherstrip $6

Vinyl Weatherstrip $5

Silicone Discs $5

Butyl Tape $15

Screws $70

Chains $10

Harness $6

Teardrop Lights $20

Sway Bar $45

Metal Plates $2

Wire and Outlets $54

Power Supply $20

Water Fill Lid SOLD -$20

Watco Stain $20

Bullseye Shellac $8

Howard’s Wax $10

Trim $18

Upholstery Labor $460

Curtain Hardware $40

Globe $12

CO Detector $8

LED Strips $28

Switches $10

Sandblasting $100

Paint $5

Propane Tank $12

Fittings $20

Door Catch $6

Plank $9

Fittings $5

Jack $30

Table $103


Bringing our tally to: $3,586


Until next time dear readers, shasta la vista...

Sunday, April 11, 2010

Hello, I'm Back!

Hey everybody! Did you miss me? I am afraid that I have been hibernating for the winter, stopped progress on the camper, and neglected my faithful readers. I don’t want you to think that I have been lying on the couch all day though. My momentum slowed after I hit my fall camper rally deadline and then I ran into some necessary home repairs.


We have a sixty-year-old house with the original cast iron pipes. Well, let’s call them what they really were, long, rusty tubes that became Swiss cheese at a really inopportune moment. Is there an opportune moment to have plumbing problems? Long story short, there were some not-so-fun times under the house where I gained a healthy respect for plumbers, what they do, and what they charge. On the bright side, I figure I saved us at least a grand, maybe two and that buys a lot of Shasta parts.


Once I finished that project, I think I actually did lie on the couch for a while. Since things have warmed up a bit, I have been working on a drainage system for our gutters, that I can tie into rain barrels for our vegetable garden, and a sprinkler system for the new sod I put in the front yard last fall. I still have a couple house projects left; I am going to do my own home efficiency audit, add some more insulation to the attic, install an attic fan and seal up a few energy leaks throughout the house. I still need to clean out the garage and then I can get going on the Shasta again.


Back to the Shasta, I need to work on the wings, install my new jack, build a new dining table, overhaul the door, get an awning made by Marti, and work on my hidden a/c project. There are a few other odds and ends that I will remember when I get going again. We got some cool decorations over the holidays, some light strings, flamingos, and we also found a very cool vintage metal cooler and water jug on a thrift store expedition for our mid-century Etsy store, called Suddenly Lucky, that I think I will keep instead of selling. I will snap some pics of the loot soon.


We are planning on running up to Kansas in May for Kamp Kansas. I think it will be a family affair, my folks just bought a ‘64 Aristocrat Loliner, my aunt got a ‘69 (I think) Road Runner last fall, and my other aunt has her ‘72 Shasta compact. So I have a new tentative goal for finishing up a few more things. It helps keep me motivated. In the meantime, I hope to get out for a weekend in the camper in the next few weeks.


So to wrap this up, I am truly sorry to those of you who kept coming back only to say, “Aaaarrrrgh, still just pics of a VIN?!” I will keep my updates more frequent in the future, as I try and get this labor of love finished. (Ahem, they never really get finished, do they?) Anyway, thank you for being faithful. Drop me a line and tell me whose blogs you have been reading while I have been lazy, so I can take a peek.


Until next time dear readers, shasta la vista...


Tuesday, October 6, 2009

Vin Number Location

I had a request for the VIN location, so here it is. On mine, it is on a little plate tack welded inside the frame just in front of the propane tanks and behind the hitch. Hopefully, they put it in the same place on other years, but... Hope this helps.

Here are three pics, you can click them to enlarge, for closer inspection:

It is dead center of this pic

Here is a closer pic


Here is a close up

Monday, October 5, 2009

New trip and a few fixes, water lines, leveling blocks, etc

Well, I haven’t been working on the Shasta too much lately. I have been moonlighting for the local bar and grill on weekends, grilling burgers outdoors for the football tailgaters. Also, we would rather use a fair weather weekend to camp in the camper rather than work on it.


So, here we are at beautiful Bell Cow Lake just outside Chandler, OK on Route 66.


Don’t be fooled by the odd name, it is a nice little lake with a couple campgrounds where almost every site is shaded by oak trees. For 15 bucks a night, and only 45 minutes from the driveway, it is definitely our late Friday afternoon whim, “Hey, let’s go camping” destination. There were about 8 other campers there, almost all 10 years old or newer. We got quite a few looks and waves from passersby, but we were far enough apart that most everyone kept to themselves.


The only trouble we had from the kiddos was getting both to sleep at the same time in the same room, but it wasn’t too bad. The kids had fun. Addie got to sport her new hat to stay warm, and Will got to collect wood and build his first campfire, capture a caterpillar, chase a small tarantula, and sleep in the hammock.


Addie, middle finger approaching nostril


My two favorite girls


Will trying to con the caterpillar into crawling off the tree onto his chin


Will taking a nap in the hammock


Cheryl’s sister Jamie dropped by with her son Nate, and her friend Autumn and two pink flamingos for Cheryl’s birthday. They look great in front of the camper. I am talking about the flamingos, but the girls are cute too. Will and Nate had different ideas about the flamingos. Nate thought they should be petted, while Will thought they should be clobbered, the difference in perspective from 1½ and 2½ years old.


Flamingos


Girls


Nate, eyeballing the camera.

All in all it was a great weekend outdoors with good company, good food and a good fire.


As we camped in the Shasta, I have discovered a few new things that needed work. Luckily nothing that a few bucks and a little labor can’t cure.


One thing I have discovered, after taking her out on our second outing, leveling blocks are your friend. Second, leveling jacks are for stabilizing, so quit calling them leveling jacks. After jacking with the trailer (har d har) for longer than my loving wife would have liked, I learned that I don’t want to unhook the trailer until it is level from side to side. This is done using the scraps of wood that came with the trailer placed under the low side tire.


Here are the blocks that came with the trailer.


Once it is level, then I unhook the trailer and level it front to back using the jack in front, which is soon to be replaced since its travel is limited to only a few inches before becoming much harder to crank while making an awful screeching sound. I am thinking there is a mild bend in the leg. Once the trailer is level side to side and front to back, then I use the stabilizing jacks to keep the trailer from bouncing. Now be nice to me, don’t roll your eyes until it hurts. Before this I was a tent camper. When I was little my parents had a pop-up camper, but I was a kid. I just didn’t know. Now I do.


The nearest camper to us had a really great leveling system. After a Google search online when we got home, I decided to make one. You can buy a plastic version, but for 9 bucks at Lowe’s I got one treated 1x6 12-feet long to do the job.


The system is a stairstep setup that doubles as a wheel chock for the elevated wheel. You basically pull or back the trailer up onto the steps until you hit level. Mine has 4 levels, from 3/4” to ~3 1/4”.


I cut 4’, 3’, 2’, and 1’ boards, put a 45° bevel on one end, stacked them and screwed them together. I butted a 4” plank on the end to work as the final stop.


Four planks


My help doing the assembly; he works for room and board

The end stop
I had enough left for one last plank, so I cut one more 1’ board and I can throw it on top if I need to raise it another ¾”.

Extra plank added
~3 1/4"
~4"


The second thing I discovered is that our water hookups needed an overhaul. I hadn’t hooked up the water at the last campout, and I had never looked closely at the hookups. The city water hookup leaked at the fitting and the drain hose had enormous cracks.


Inlet fitting

Drain Line


So, I got a new fitting for 3 bucks that attached directly to the copper line, giving me a nice clean inlet.


For the drain line, I just yanked the old out and replaced it with a chunk of yellow garden hose; it was the same size as the old line. Problem solved.


Garden Hose

Old Line

New Line


For 2 bucks, I got two pvc plugs to keep dirt and bugs out of my lines.


I probably could have done these repairs in half the time but again, I had help.


I am sure that there will be more little odds and ends as we progress but she is camp ready, and I look forward to taking her out a few more times before it gets too chilly for the whole family.


Now, if I could just finish those wings and the table…


So, if you are following along, so far we have:

Trailer $900

Bearing Repack $100

Steel $10

Sealant $10

Fan-Tastic Fan $140

Three Sheets 1/8 Birch $50

3M Polish $18

Buffer Pad $12

Mothers Aluminum Polish$8

TSP Cleaner/Paint Prep $8

Rollers, brushes and trays $30

Frog Tape $10

Etching Primer $5

Goo Gone $3

Paint 3 Gallons $98

Foam $250

Upholstery Fabric $510

Curtain & Pillow Fabric $80

Glass $50

Glass Seal $72

Backframe Gasket $80

Pile Weatherstrip $6

Vinyl Weatherstrip $5

Silicone Discs $5

Butyl Tape $15

Screws $70

Chains $10

Harness $6

Teardrop Lights $20

Sway Bar $45

Metal Plates $2

Wire and Outlets $54

Power Supply $20

Water Fill Lid SOLD -$20

Watco Stain $20

Bullseye Shellac $8

Howard’s Wax $10

Trim $18

Upholstery Labor $460

Curtain Hardware $40

Globe $12

CO Detector $8

LED Strips $28

Switches $10

Sandblasting $100

Paint $5

Propane Tank $12

Fittings $20

Door Catch $6

Plank $9

Fittings $5


Bringing our tally to: $3,453

Until next time dear readers, shasta la vista...